Easter eggs, How to dye them with natural colours: Onion skins
- Apr 1, 2022
- 3 min read
Updated: Apr 10, 2022
Easter is around the corner and in some countries is a tradition to paint or decorate eggs, Here I'm going to show you how to decorate and dye Easter eggs using onion skins...yes! the onion skins that you normally throw in the compost.

the best part of this recipe? because you are using natural colouring you can eat the egg at your Easter lunch, so there's no such thing as wasting food.
This is a very simple and fun process you can do it with your kids so they can enjoy creating something personal.
...because you are using natural colouring you can eat the egg at your Easter lunch...
The whole process takes about 30 minutes, 10 minutes preparing the egg and 20 minutes to cook them, if you want to achieve a stronger colour you can leave the egg in the dye overnight.

How to dye easter egg with onion skins
You are going to need:
Half dozen of Eggs ( you can use brown eggs or white eggs, with white eggs you will notice the change of colour more easily)
A pair of pantyhose
The skin of two big Onions, you can use brown or yellow onions
herbs or leaves to decorate the eggs.
A pair of scissors
A saucepan
a splash of white vinegar
Dyeing Easter eggs with onion skins
1. First, we have to clean the eggs with cold water, the eggs are still raw so be careful not to break them. While we dye the eggs we are also going to cook them inside, you can eat them during your easter lunch.
2. Then, we are going to pick some herbs and leaves to decorate the surfaces of the eggs.
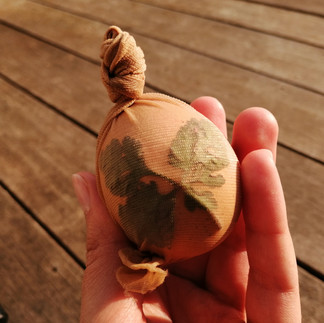
3. To decorate the eggs take a pair of pantyhose and cut them into small pieces to cover the eggs. Take the egg already washed and place the leave or herbs on the surface, then with the pantyhose cover the egg and secure the leaf to the surface make a knot to close the pantyhose, remember to be very carefully, the eggs are still raw.

4. before covering another egg, make a knot at the end of the pantyhose then cut the pantyhose allowing enough space for another egg.
5. Then do the same with all your eggs. When you have all the eggs are ready, is time to dye them!
6. Take a saucepan and pour enough water to cover the eggs. Then add the onion skins, mix well and turn on the heat at medium temperature.

7. After 5 minutes you will notice that the skins start to release some colour, which means is time to put the egg inside. Put them all inside and boil for 20 minutes, to get some nice cooked egg.
8. Add a splash of vinegar to help remove the eggshell when you want to eat them.
9. After 20 minutes remove the pan from the heat and let it cool. Then take the egg and dip them in cold water. Open the knot, you can cut the knot but I prefer to open it so I can use the pantyhose again.
10. Remove the leaf to reveal the print on the egg, do the same with all the other eggs.

And just like that, your eggs are ready to decorate your Easter lunch.
You can also use Red cabbage to dye your Easter egg, here I have a youtube video where I explain how to do it.


Comments